Wednesday, May 15, 2013

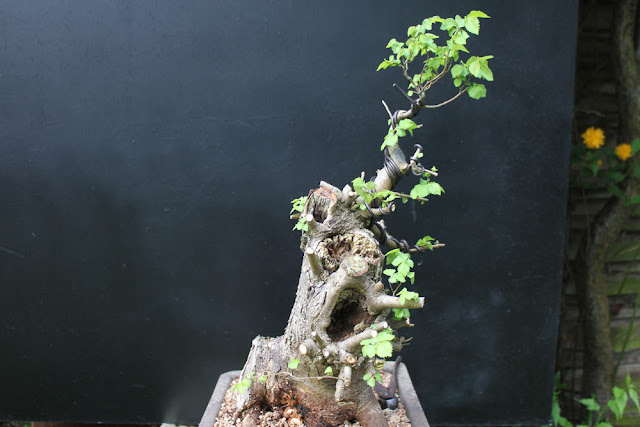
English Elm. Back to basics!!!

I bought this English Elm (Ulmus minor) last week at a local club I visited. I liked the tree and thought it had a promising future. Although the canopy looks finished, the branches were all straight and lacked movement. I usually cut trees back to basic lines and then work from there. Bottle of Single Malt for size reference
The back of the tree

An old trunk chop in the middle of the tree

An old root chop That will make for some interesting carving in the future

A large straight branch was removed first but all the rest except the leader will go too.

The first cut.

                          5 minutes later and all that's left is the trunk line. Wire was added to the first branch and     leader to add some movement.
Side view to show how the top was bent towards the front.

The back of the tree.

As is common with most collected Elms, they lack finer roots. This one is typical in having only a few and they are massive old sucker type roots. I decided as well as removing the bark to let the wood harden in preparation for carving, I would also layer the tree to produce better roots. All the work was done with a Makita and then the top edge of the layer was finished sharply with a Knife.

The carved areas on the trunk will be widened in the future as the tree callouses. This will hepl to add a natural die back appearance.

The back again. The bark and cambium are 15mm thick.

I am looking forward to carving this root on the back

I expect the roots will grow quickly and perhaps a couple of months. All new buds will be allowed to extend fully for a couple of seasons

The cut around the base of the tree was packed with Sphagnum Moss

A wall was created with three strips of pot mesh. They were wired together and the mesh was adjusted to  make it flush with the soil.

The mesh was then packed with more Sphagnum Moss and then top dressed with Acadama. This will stop the birds from stealing the Moss for their nests. All the bark removal was sealed with wound paste. The tree will now be fed well and turned regularly for a nice even root spread.
Carving will start in a Month, when the wood is hard.

Extensive shoots but no roots as yet. Because of this I thought it wise to get some primary branch placement in place.
The branches were leaf pruned to see the structure, then cut back and wired.

 Primary structure in place. Plenty of feed again and hopefully good further extension to help the roots in the hot weather.

All the wires removed and ready for a prune for good budding. Unfortunately the layer hasn't issued roots as yet so it has been redressed and hopefully this year it will root
Feb 2014


Monday, May 13, 2013

Creating taper in a Taxus

This Yew has been carved over the last couple of years.Collected back in 2008/9, the Taxus was originally 20 feet (5/6 metres) tall. The taper wasn't great so I wanted to improve it. Rather than carve the taper into the deadwood, I decided to thin the outer wood and bend it inwards with a live vein.

                                                  This is the section of the front I pulled in
I released the section by using a Gigsaw to cut down the trunk. The inside was thinned to allow the live vein and deadwood to be moved inwards.

Once it was thin enough to move by hand slightly, I put a hooked screw on the inside of the deadwood
A hole was drilled in the deadwood next to the live vein and a Copper guy wire was used to pull the wood in to create the necessary taper. The foliage was left alone at this stage.
The area cut with the Jigsaw was then carved. Detailed carving will be carried out soon

You can just about make out the taper here. Notice the vertical branch on the tapered section?
Here is the vertical branch today. Time to add it to the deadwood
I used a branch splitter to start the process and then a Dremmel to smooth and get deeply behind and below the branch.
The back was sealed with wound paste, a piece of plastic hose was used to protect the bark and then a Copper wire was used to draw the branch to the deadwood.
 Objective complete. The branch will be left to grow freely this Summer and I hope to style this tree in the               Autumn. More refinement carving will take place in the next couple of weeks

The wire was replaced yesteday as it looked a little tight. I decided to use a blot across the branch and will move it ov a regular basis to stop scarring.


The whole process of this tree can be seen if you click the following link....


Saturday, May 11, 2013

Thinning out a wid Welsh Blackthorn Prunus spinosa

I recently visited a friend of mine in Wales and before I left, he very kindly gave me this Blackthorn he had collected a few years previously. At this stage they are just a mass of inter twined twigs. Some dead and some alive. Now that it is finally in leaf it is easier to distinguish between the two.
The trunk line is better on this side
After much careful pruning I am leaving it here to see how the growth progresses.
I will update this thread with any new work.

Wednesday, May 8, 2013

Sloe motion.

            I re potted this Prunus spinosa into a Peter Krebs pot back in February. I have been watching the trees progress like a hawk over the months since and was starting to think the tree had died.
           Yesterday I breathed a sigh of relief when I noticed a couple of buds have started to emerge. What with the very long Winter and the re potting, I just think the tree was sulking.

Enough to give me a bloody heart attack!!!!