You will have to be patient with this Pine as I am working on it over a number of days. Because of it's sheer size, I cannot take it into the workshop and so it becomes a fair weather tree to work on and I do live in the UK afterall.
This tree was collected from mountains near Inverness in Scotland 2005. It came to me in 2007-8 but I don't have any very early pictures. This first picture was taken at a local show in 2009. The pot is by John Pitt.
Since then all the wire has been removed and some major faults corrected. Some collected Sylvestris have quite compact foliage. Scandinavian,Italian and French examples for instance. This is not so with many trees collected in the UK and my impatience to get this tree in some sort of order meant that unnatural bends were used to achieve a pleasing silhouette.
To correct the faults several areas were approach grafted and the tree was then allowed to grow unchecked for 2 years. All the grafted areas took successfully. The tree became pot bound and was re potted the Spring after this picture was taken.
This photo was taken a few days ago and nearly a year after the repot. The orientation was changed slightly as I want to bend the top over to the right some more and by changing the planting angle to the left, good balance will eventually be achieved.
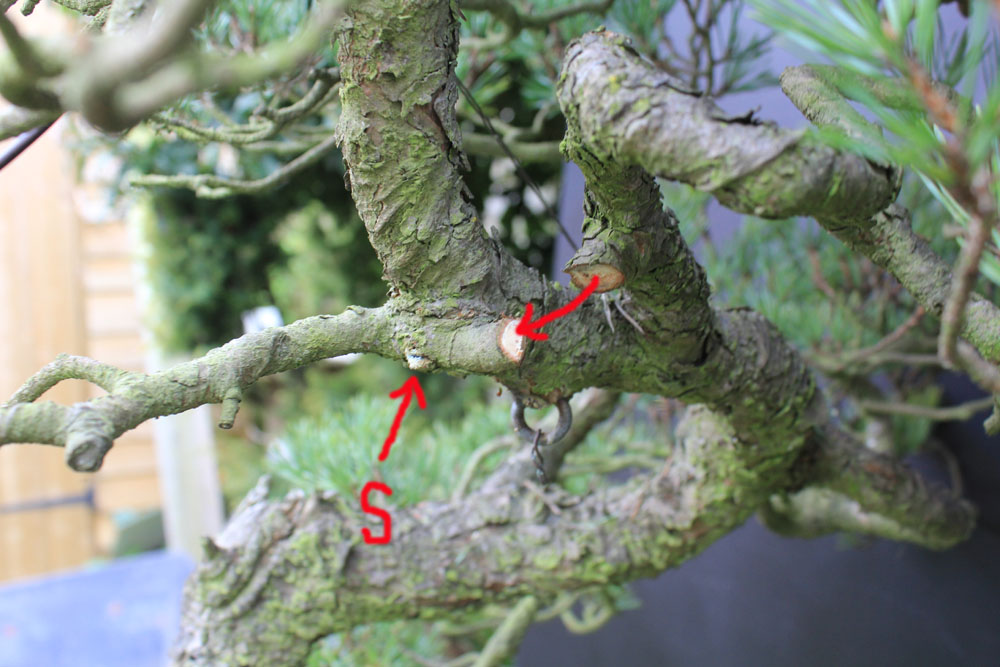
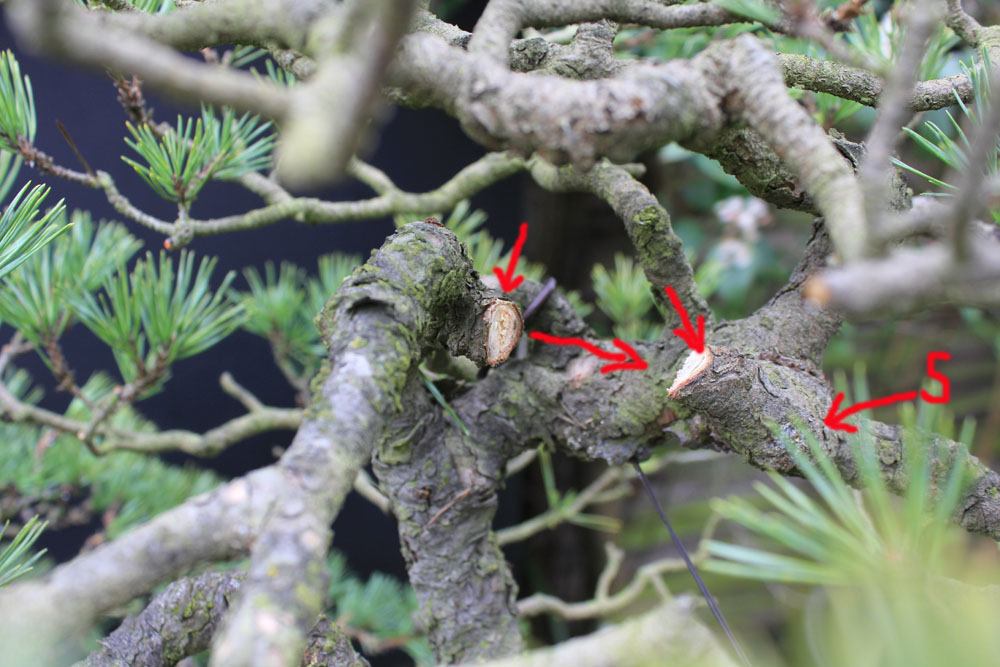
Here are some of the pictures of the approach grafts. All the red arrows show the sap direction and the s stands for the screws used to fix the grafts in place. Both the branch and trunk had the bark and cambium removed and the sapwood (Xylem) was cut to make the joint flush and more convincing. Cut paste was pushed around the wounds for protection.
The next job was to thin the tree out and remove old needles. This allows better application of the wire and lets light into the tree for better budding and air circulation.
The whole tree thinned out. This took many hours. I started to wire the bottom branch but wasn't happy with it. The branch above had much better branch structure and so I cut the branch out
I thought to improve the lines in the three trunks as well. They were all in a line and by pulling the smallest forward, it would give a better perspective in design. I placed an iron bar across the deadwood and held it in place with wire
A coil of alluminium wire was placed on the iron bar to keep the wire from sliding back down the bar
Here you can see the second approach graft. The red lines show where the cuts will take place
Again, the arrows show how the branch was twisted to shorten the branch and enable the graft.
The section that was removed.
Some ugly and unnatural bends were cut out of the second trunk as well
The branch was then torn down and a channel carved to thin the wood and place some wires for bending
Wires were placed in the channel and held with wound paste.
The whole section was then wrapped with Raffia in preparation for wiring.
A view of the back of the lowest trunk showing the much better branch.
Branches that were removed from the lowest and middle trunk.
Wiring has finally started.
The lowest branch wired and roughly shaped . Final tweaking will take place after the whole tree has been wired and is ready for the final design work.
The back of the branch again. The middle trunk will stand over the top of this smaller trunk and therefore shade out this trunk slughtly.
Now ready to make a start on the middle section of the tree. This is looking like a long thread and I will update in the next couple of days. Watch this space.
Another day and another branch to wire. Today I concentrated on the middle one.
Just started to wire.
All wired and stating the styling.
Just roughly placed for now until the largest trunk is finished.
Time to make a start on the largest trunk. There are three grafts that need separating. The first two were just separated for now.
This larger graft is on the front of the tree and very visible. I wanted to add some movement to this jin so working the wood while it is wet and full of resin is a good plan.
The branch was sawn through and then the bark was stripped off
The wood was then twisted by hand to create the better movement.
Once the branch was twisted, I fixed it in position with a guy wire. When the resin and sapwood have dried properly, It should hold it's position.
You can see here that by twisting you get some nice shapes and the wood separates in a nice way
Once it has dried, I will carve the cut end and open the cracks slightly.
Time to start wiring the main trunk. I started on the left branch leaving the top of the tree to the end.
Just the top left to do. Once the whole tree is wired, I will adjust the heights as There isn't much between the height of the middle branch apex and the top of the branch I have just wired
I took this picture to show the depth of the branch from the side. F stands for front.
One final session to go.....
Finished the wiring yeaterday. Heres a reminder of how the top was...
It was really hot yesterday and I burned the top of my head. Once the top was wired, the branches on the right at the top were bent upwards as I wanted to bring the trunk top down and to the right with a guy wire.
Close up of the top before styling work started.
Chris R wanted to see the tree finished off and I gave him the job of stripping a few jins and the shari.
Chris really enjoying himself
Working on the shari to remove old sap
I extended the shari round to the back more yesterday. Over the years the u shaped feature in this trunk has expanded a lot. This will create enormous inverse taper and ruin this feature. By adding the shari it will remain this shape and thickness.
The styling was finished last night as it was getting dark
This morning I took a better picture and have added more background for contrast. This is my favourite line for the trunks but it shows little character to the overall image and lacks negative space. The alternative is to compromise the line in the trunks slightly and go with the image below for now. I will turn some more branches to deadwood in time, once the branches have set.
Thanks for watching
Or perhaps this as a front. Much better negative space and the lines in the trunks are less flat. I would like to move the little trunk more to the right but as it is under enough strain pulling it forward, I will let it rest for now. No need to compromise the health of the tree for a quick fix.
Time for some carving. I wanted to create a hollow in the largest trunks middle section and pierce through it to add a feeling of old age and decay.
I was kindly sent this new tool to try out. Made by Chris Guise who is an engineer, this tool adds a v shaped cut.
Once i had used a longer cutter in the Makita to hollow out this section, I got to try out this little carving bit.
I found it very useful and because of it's small size, you can turn the cut in quite a small area.
As you can see tha hollow was made so that some areas of the face were quite thin and this allows the piercing to take place.
Finer detail was then added with a very fine and small circular saw blade. This helps with the finest detail.
Then the whole area was run over with a small rotary wire brush to smooth and soften hard edges and remove any remaining tool marks.
The deadwood was covered in a mixture of Lime Sulphur and dark ink and then the surface wiped and LS applied again. This helps add further depth to the work and gives good contrast.
The deadwood has dried properly now
And after a rest period, I also added to the bar and pulled the shorter trunk more to the right.